Preparing for SIMH – Setting up the Google Cloud account and installing the Google Cloud SDK
Posted by tomperrine in Computing History, retrocomputing, System Administration on January 23, 2019
This installment shows how to set up a Google Cloud account in order to run the SIMH emulator in a GCP instance. This is NOT a complete training or tutorial on Google Cloud, but does explain the settings needed for this project.
In this prior post, I’ve shown how the guest OS will be running on the emulator, in a virtual instance in Google Cloud. This post talks about getting a Google Cloud set up to make all this possible.
Google has written a huge amount of documentation. There are tutorials, quickstarts, API docs, and examples and labs. If you have trouble, Google Cloud Help has everything you need to get unstuck.
In order to prepare for the rest of this series and running SIMH in GCP, start with the Google Cloud console and go through this example. It uses the Google Cloud console to do a part of what we’ll do later with scripts.
Those examples show how to set up a project and enable billing. After that, a VM (instance) is created and Linux is installed. Once you have logged into the instance, and logged out, you can then delete the instance to clean up.
Follow the example, and your Google Cloud account will be ready for the rest of this series.
You’ll also want to set up SSH keys for use with “oslogin” – see the documentation here.
Keep the project open, as you’ll need it later to run the emulator instance.
Finally, we’re going to be using BASH scripts and the Google Cloud SDK (AKA gcloud) for all the future example.
You’ll need to install the SDK, using these instructions for your particular operating system.
Next time we’ll begin the first bash script, to use gcloud to set some configuration variables we need to create and run the SIMH instance.
An overview of installing and using SIMH in the Google Cloud (GCP)
Posted by tomperrine in Computing History, retrocomputing, System Administration on January 16, 2019
As I mentioned in this prior post, I’m running some legacy operating systems (Multics, UNIX v7) using SIMH in Google Cloud. In this post I’ll give an overview of the installation process, and how the legacy OS stacks on the emulated hardware SPU, etc.
The process of using Google Cloud to run SIMH for hosting a legacy operating system has these major steps, no matter which CPU you’ll be emulating, or which operating system you’ll be hosting.
- Configure your Google Cloud account. Since we’ll want to script all of this later, we’ll save some key values in a script that can be included in later steps.
- Configure the GCP instance. This involves selecting the zone, CPU (instance type), operating system, etc. Again, this all gets saved in a script for future (re)use.
- Create the GCP instance. This creates the instance (virtual host) of the proper instance (CPU) type, in the correct location, and does the initial operating system install. When this is done, you have a virtual instance running Linux (typically) in the cloud, albeit with an un-patched operating system.
- Patch the base operating system.
- Install the development tools that are needed to compile SIMH.
- Load the SIMH source code, configure and compile it. At this point you have an SIMH binary that will emulate the desired CPU(s) all running in GCP.
- Copy (and then customize) the files needed run the desired guest OS on the emulated CPU to the running instance. This will include SIMH configuration files, disk image files, and other SIMH resources. This may vary considerably depending on the version of SIMH and the guest OS.
- Start SIMH, which will bootload the guest OS. If this is the first time the OS has been booted, you may need to then log into SIMH to issue commands, or even directly into the running guest OS for final configuration.
- After this, you can halt the guest OS and save the disk image. This saved state lets you reboot the system again (and again) with emulated persistent disk storage.
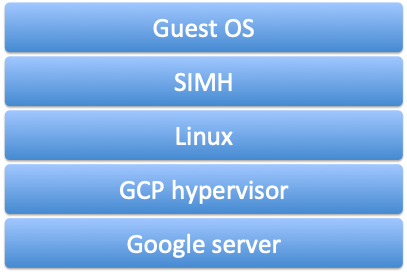
At this point, you’ve got a guest operating system, running on an emulated CPU, on top of a Linux system, running on a hypervisor, in the cloud.
It looks something like this:
For simplicity’s sake, we can combine some of the steps above into fewer steps, each of which can be a separate script.
- Capture configuration information – a single script to set environment variables for the Google Compute Account and the instance configuration.
- Create the GCP instance, install the operating system, patch it,
- Install the development tools needed to build SIMH, load the SIMH source code, configure and compile it. Copy the needed SIMH configuration files at the same time.
- Copy (and then customize) the files needed run the desired guest OS on the emulated CPU to the running instance. This will be different for each operating system.
- Start SIMH, which will bootload the guest OS.
Next time, we’ll look a little bit more at the GCP account setup and capturing the account and instance configuration information.
Retrocomputing – using SIMH to run Multics on Google Cloud Platform (GCP)
Posted by tomperrine in cloud, Computing History, Multics, retrocomputing, System Administration on January 8, 2019
Last Fall (Oct 2018) I started playing with SIMH, and using it to run some rather ancient operating systems in the Google Cloud (GCP). So far I’ve been able to run Multics, UNIX V6 (PDP-11), and 4.0BSD (VaX).
I started down this path by using the dps8m fork of SIMH to run Multics on a Raspberry Pi 3. This worked very well, and produced performance that for a single user, matched the original mainframe hardware. Not bad for a US$35 pocket sized computer emulating a US$10+ MILLION mainframe (of the 1980s). Of course, Multics supported 100s of simultaneous users using timesharing, but at its heart, Multics (up to 8) CPUs were about 1-2 MIPS each and the system supported up to 8M 36-bit words (32 Mbytes) per memory controller, up to 4 controllers per system for a grand total of 128 Mbytes per system. Yes, that’s Mbytes, not Gbytes.
For comparison, The $35 Pi 3 B+ runs at about 1000 MIPS, and has 1Gbyte of RAM. The Google Compute f1-micro uses 0.2 of a ~1 Ghz CPU and has 0.60 Gbytes (600 Mbytes) of RAM, making it a reasonable fit.
I’ve been building tools to allow anyone to install SIMH and any of these operating systems in the cloud, so that they can be experienced, studied and understood, without having to use dedicated hardware, or understand the details of using GCP, or SIMH.
In this series of posts, I’ll introduce how I’m using GCP (with scripting), a little about SIMH, a little bit about the hardware being emulated, and the historical operating systems and how to run them all in the GCP cloud, pretty much for free.
You should start by looking into Google Cloud Platform (GCP) and using some of their tutorials.
All of the SIMH examples I will show are running Ubuntu Linux on tiny or small GCP instances.
You can get started by reading about SIMH on Wikipedia, at the main SIMH web site, or at the Github repository for the software.
A low tech way to get a mail server blacklisted using victim’s own forums
Posted by tomperrine in best practice, Computer Security, Creativity, scale or die, Stupid, System Administration on April 10, 2018
As they say in the military, “If it’s stupid and it works, it isn’t stupid”.
This is a low-tech, labor-intensive way to get a victim’s email server blacklisted at a major public email service, using the victim’s own public forums. The email provider was very helpful in getting this sorted out, and it’s not clear that this “attack” is specific to them.
(This situation can also happen “accidentally” if a number of users subscribe to your forums, change their minds and then report the notices as SPAM instead of unsubscribing from the forums. That doesn’t seem to be the case in this instance.)
- Sign up for a few free email accounts with a public email provider. Get as many as you can, perhaps at least 20. Get some friends to help you. More is better.
- Go to the victim’s public forum servers and use each email account to sign up for one (or in some cases more than one) forum account per public email account. This gives you 20-100 forum accounts. Let’s use 20 as the lower bound and 100 as the practical upper limit.
- As an alternative, if the forum doesn’t use opt-in confirmation, just subscribe a few hundred random people to get the forum notifications. Let them do the work for you.
- Set each forum account to send an email notification for every forum update, or as many as possible. Some forum systems allow you to “watch” individual threads, some allow you to “watch” the entire forum system, getting one email for every other users’ post.
- In a moderately large-ish forum system, there could be perhaps 1 update per minute, so 60 per hour – that’s now 60*20 accounts (1200) or even worst case 60*100 accounts (6000) emails per hour going out from the forums system, perhaps through the victim’s outbound SMTP server. Either way, the target public email system is seeing a lot of email coming from one domain or IP range very quickly.
- If the rate alone isn’t enough to get the forum or SMTP server blacklisted, then go into each of the public email accounts and mark ALL the forum notifications as SPAM. Or if you subscribed a few hundred random people to the notifications, they’ll do the work for you!
- The combination of high email rate combined with the 1200-6000 SPAM use complaints should be enough to get either the forum server or the victim’s outbound SMTP server blacklisted.
Note that each and every part of this situation is working as intended. It’s only when they are combined that that you get problems. (Unless the forum doesn’t do email address opt-in verification, in which it’s all on you.)
This “attack” depends on these things:
- lots of manual labor, either by yourself or with some friends, or even some random victims
- a forum system that allows one user to cause the system to send lots of email based on the behavior of many people
- a moderately busy forum system
- a public email system that is biased more towards rate-based and user complaints than message content
- a public email system that the victim’s user base depends on, as in “must communicate with users in that public email system”
Fortunately, this is relatively labor-intensive, and not amenable to automation.
Countermeasures are left as an exercise for the reader 🙂
fewer chat choices leads to stronger more collaborative global community
Posted by tomperrine in best practice, Community, System Administration, the business of system administration on April 3, 2018
We reduced the number of choices for online chat and ended up with a more concentrated, focused and collaborative global community. This wasn’t planned, it happened organically, and it’s still in progress. But it shows the value of allowing and encouraging people to concentrate into common systems, even ignoring any financial considerations.
As recently as four years ago we had a multitude of separate group and direct chat applications. We had multiples of everything from private in-house Internet Relay Chat (IRC), Jabber and similar servers to several generations of Microsoft products. At one point I counted no fewer than 8 different chat servers that I needed to use myself, just to reach my customers and peers. For the record, that was two different Internet Relay Chat (IRC) servers, two different Jabber servers (the original open source XMPP server), two different Slack instances, Microsoft Lync, and Microsoft Office Communicator (which is now Skype for Business).
(This doesn’t even get into the multiple WebEx, Zoom, GoToMeeting and special conferencing systems.)
Completely ignoring the efforts and costs of running the in house IRC and Jabber servers, the major problem was people wasting time trying to remember (or figure out) which app or server they needed to use to reach a particular person or group. This led to lots of conversations like this…
“Does Susan use Slack?” “No, she’s on Microsoft.” “I don’t see her in Lync?” “She’s in Communicator”.
“Dear IT – I’m in Tokyo and I can’t reach UK R&D over Slack. Please fix.” “R&D is in the other Slack.” “What other Slack?”
This was bad enough for individuals, but finding out that perhaps 5 people who needed to collaborate were “homed” on three different platforms required getting them all accounts on a single platform just for that particular project or need. This led to an even worse explosion of per-user accounts, as now everyone had to have multiple accounts on multiple platforms.
This is similar to, but worse than the fracture in social media. While the “do I find you on Facebook or Google+ or Reddit or Twitter or Instagram or email or SMS?” question is annoying for individuals, having this in a global company is untenable in the long term.
Slack started as a grass roots effort among several of our internal communities. These groups “routed around” the IT-provided solutions and adopted Slack independently, and in most cases without knowing about each other. Obviously, this initially made the problem worse! But, as these groups found out about each others’ Slack instances, they began to talk about whether it would be good for them to merge their communities into fewer (or a single) Slack instance.
Importantly, all the IT organizations around the world realized what was happening and helped and encouraged the move. They made Slack a supported and preferred solution, instead of fighting it.
Over the past year some of our groups around the world have been organically moving their communities to Slack, retiring old services on their own. All the IRC servers and most of the Jabber servers have been decommissioned. Multiple Slack instances have been merged into a new “main Slack”, with more planned to move this year. More importantly several “new” chat systems have NOT been launched; those communities have agreed to adopt Slack instead.
This only worked because people wanted “one place” to gather and Slack offered a “good enough” experience. It’s not important that they selected Slack, it’s important that they all want to be in “one place”, and that “they” selected Slack, it wasn’t imposed. And frankly Slack was better than almost all of the legacy systems.
It’s not clear that we’ll stay on Slack forever, as some of the promised Microsoft solutions may offer better integration with Active Directory, desktop voice and video chat, etc. But until those come, all our users have the option of a single place to collaborate.
Why I killed our IPv6 project…
Posted by tomperrine in best practice, IPv6, System Administration on January 16, 2018
Seven years ago we started an “IPv6 project”. The goal was to deploy IPv6 throughout our internal game studio network. After two months of analysis, I approached my boss and recommended we kill it. At least as an “IPv6 project”. It was reborn as a “clean up our network architecture, and oh by the way, add IPv6 (and a bunch of other things)”.
2018? Wait, what?
Posted by tomperrine in best practice, Community, Computer Security, Computing History, System Administration on January 9, 2018
Wow, I’m behind. It was a busy year, and not a lot going on that I could really talk about publicly.
The recent meltdown and spectre bugs have brought back some memories from Orange Book days. I’ve also been spending a lot of time thinking about “IT transformation” and non-technical stuff. I’ve also been to the UK and Japan, twice, each, which may become the “new normal”.
Let’s see what happens in the next 12 months.
Zabbix “became not supported” – solved
Posted by tomperrine in best practice, monitoring, System Administration on November 15, 2016
I think I’ve found one of the answers to a long-annoying Zabbix issue related to SNMP items “flapping” from “became supported” to “became not supported”.
TL;DR – using an SNMPv1 query against an SNMPv2 device will confuse Zabbix. You’ll see intermittent failures of different tests as the device flaps between OK and “unknown”. This can be hard to track down, as its’s not a hard repeatable failure. It’s not the only cause of this error, but fixing this will solve many of the issues.
Details:
While looking through our Zabbix server logs I found LOTS of these:
2031:20161027:111122.224 item "netapp-cluster.thuktun.com:netapp.disk.prefailed.count" became supported
 2028:20161027:112119.172 item "netapp-cluster.thuktun.com:netapp.disk.prefailed.count" became not supported: SNMP error: (noSuchName) There is no such variable name in this MIB.
 2030:20161027:120146.448 item "netapp-cluster.thuktun.com:netapp.disk.prefailed.count" became supported
 2028:20161027:122120.026 item "netapp-cluster.thuktun.com:netapp.disk.prefailed.count" became not supported: SNMP error: (noSuchName) There is no such variable name in this MIB.
All of these referred to a NetApp in cluster mode, but I found a few similar messages related to some “NetBot” cameras around as well. Additionally, the actual test item varied; there were about 6 different tests that were all failing intermittently. The failing tests were:
- netapp.disk.prefailed.count
- netapp.disk.cfe
- netapp.disk.name
- netapp.disk.version
- netapp.disk.failed.count
- netapp.disk.spare.count
A few Google searches returned some items related to this kind of issue, back to 2013
- https://www.zabbix.com/forum/showthread.php?t=38912 (LenR mentions: “Should the items be zabbix-trapper instead of zabbix-agent? I think I’ve seen this with incorrectly defined zabbix-sender updated items.”
- https://www.zabbix.com/forum/showthread.php?t=22114 (This shows that this has been seen as far back as 2011)
- http://serverfault.com/questions/761645/zabbix-issue-with-lld-lots-of-became-supported-became-not-supported (“should be using Zabbix trapper instead of …)
All of these are talking about Zabbix trapper vs Zabbix agent, that is using the wrong type of check for the test item, but no mention of SNMP.
Let’s look at the Zabbix configuration. Are we using the trapper or the agent for these test items?

Note that the NetApp template doesn’t use the Zabbix trapper or agent, it uses SNMP. But, some tests are SNMPv1 and some are SNMPv2. This is likely due to the fact that some versions of NetApp have had varying support for v1 and v2 over the years, and whoever created the template originally started with just v1. Over the years, as more test items were exposed, new tests were added, but using SNMPv2 and the old tests were left at SNMPv1?
Interesting. All of the failing tests are using SNMPv1. Not all v1 tests are failing, but all failing tests are using v1. There’s nothing here about Zabbix trapper or the Zabbix agent, but there is a (potential) mismatch. This shouldn’t be a problem, but let’s find out.
Over the next few hours, as each failure showed up in the Zabbix logs, I switched that particular test to SNMPv2. After being changed, that test never again “flapped”.
It seems that the keys to solving this were:
- LenR’s comment from 2013 about incorrectly defined items (although he was mentioning the zabbix-sender, not SNMP)
- Realizing it wasn’t a problem with the trapper vs agent, or an incorrect item definition in the agent, but that it was a mismatch in the server’s definition in the test item.
- That SNMPv1 and V2 are being treated differently in the Zabbix server, and that usually doing a v1 test against a v2 device will usually work, but not always.
- The “soft” failure of the v1 test against the v2 device “presents” as a MIB problem (“SNMP error: (noSuchName) There is no such variable name in this MIB.”), not a protocol failure.
I changed all of the failing NetApp tests to SNMPv2 last week. Since then all the tests that were changed from SNMPv1 to SNMPv2 have been fine. There have been none of these errors in the logs for 5 days.
Next: What about those NetBotz? Or maybe Zabbix meets IPv6 🙂
IPv6 at AWS – Route53
Posted by tomperrine in best practice, IPv6, ISPs, System Administration on November 11, 2016
Hooray! AWS users can now serve their DNS info over IPv6. You could serve AAAA records before, but only over IPv4.
This finally gives AWS customers a way to deal with IPv6-only customers (as are appearing in Asia), who might have otherwise had to depend on ISP proxies or CGN (Carrier Grade NAT), host their DNS elsewhere, or be unable to reach services hosted in AWS.
IPv6 – now from COX (San Diego)!
Posted by tomperrine in IPv6, personal IT, System Administration on November 9, 2016
As you recall, I’ve been lamenting the lack of direct IPv6 via my local ISP (COX) since 2013.
It seems that some time in the past 3 months, they silently enabled IPv6 in my area! I was preparing to reconfigure my tunnel from tunnelbroker and decided to “just check”. Cox is now correctly(!) serving IPv6.
I had to turn off my Hurricane Electric tunnel a few months ago, as Netflix began blocking as many tunnel services as they could, over geo-location “issues”.
I was able to set my Apple Airport Extreme to “auto configure” for IPv6, and I’ve got proper addresses, routers and even DNS over IPv6.
Thanks Cox!
 LOPSA Member Blogs
- An error has occurred; the feed is probably down. Try again later.

